How to Add a Print Friendly Button to Blogger


Add Print Friendly Button to Blogger


If we add Print friendly button to blogger blog , then print button will appear on posts in blogger.This print friendly button will help you to print articles on blogger blog.

      follow the below steps :


step 1 : Go to PrintFriendly web site and click on website button

next choose site type as Blogger/Blogspot
next choose button button style
and next select features as you like
at the bottom you can see add code directly to template and copy that code

step 2 : go to blogger dashboard

step 3 : click on template ,then click on edit Html and tick expand
widget templates box

step 4 : and search  <data:post.body/'> tag in template code

step 5 : paste Print friendly button code just before or after the
<data:post.body/'> tag and then
click save template

*On old blogger template :*


on old blogger template search  <div class='post-footer'>

paste print friendly button code after <div class='post-footer'> tag in
blogger template


How to reduce space between header and pagelist widgets in blogger


reduce space between header and pages in blogger


We can see small space between blog header and static pages on blogger blogs.We can delete that space.At any time after reducing space between blogger header and pagelist widgets , we can increase or decrease space.

      Follow below steps :


step 1 : go to blogger dashboard

step 2 : click on template

step 3 : click on edit html

step 4 : search below code

*.tabs-outer {*  under tabs css code in template code

Add below line just before *}* of the above code

*margin-top: -10px !important;*

step 5 : click on save template.

If you want to increase / decrease space between header and pages in
blogger just increase/decrease value in the given code.

How to Change Comment Timestamp Format in blogger:


Change Comment Timestamp Format in blogger


The comment time stamp shows the publishing date of comment in blogger. Different  comment timestamp formats available in blogger.we can easily change comment time stamp format on blogger blog.

      follow below steps :


step 1 : go to blogger dashboard

step 2 : click on settings

step 3 : click on Language and formatting

step 4 : under Formatting  select Comment Timestamp fomatiing from the
list next to Comment Timestamp Format

step 5 : click on save settings.

How to decrease/reduce space between blog title and description in blogger header


Decrease space between blog title and description in blogger

We can decrease the space between blog tile and blog description on your blogger header. It is easy to reduce space between blog title and header in blogger.We can also increase the space between them.
 

Follow below steps :


step 1 : go to blogger dashboard

step 2 : click on template

step 3 : click on edit html

step 4 : Search below code  under header section in template code
.Header h1 {

After finding , add below code to reduce space

*margin-bottom: -20px !important;*

step 5 : click on save template.

If you want decrease more space b/w blog title and description just decrease px value in the above code.

how to increase posts font size in blogger blog


Change font size of blogger posts

It will be comfortable for the visitors to read your blog posts by increasing font size of your blogger posts.By default the font size of  blogger blog posts is small. We can easily change the font size of posts
in blogger.The font size between 16 to 18  is good for blog posts.

      Follow below steps


step 1 : go to blogger dashboard

step 2 <javascript:void(0);> : click on template

step 3 : click on edit HTML

step 4 : search      *.post-body {   *

add below code before closing tag of above line

font-size: 16px;

step 5 : click on save template.

We can also change blogger posts font size by click on template and then
click on customise. click on advance and change page
<javascript:void(0);> font size.

But we can set font size as 18 with this process.So if we want font size 18 then we have to add *font-size: 18px;  *on template code like in *step 4*

How to Disable Right Click on Images in Blogger


Disable Right Click on Images in Blogger


By disabling right click on images we can save our own images with out copying from others.After disabling right click , mouse right click will not work on blogger images. We can disable right click on images in
blogger blog without adding any java script. With oncontextmenu attribute we can disable right click on blogger images.

      Follow below steps :


step 1 : go to blogger dashboard

step 2 : click on posts

step 3 : view posts and switch to HTML mode

step 4 : find image tag and add below code to image tag

oncontextmenu="return false;"

add oncontextmenu="return false;" to image tag , like below
<image oncontextmenu="return false;" ............../>

step 5 : click on publish posts

How to change "post a comment" text on blogger blogs

Change post a comment text on blogger blog


"Post a comment" text will appear above comment box or comment form on blogger blog.We can customize that message as we require.We can change that post a comment text and also add image in the place post a comment text on blogger blog.If we change post a comment message with an polite message then we can attract our blog visitors.So by changing that default /post a comment /text we can get more comments.In this post i'm explaining about how to change post a comment text on blogger blogs .

      Follow below steps


step 1 : go to blogger dashboard

step 2 : click on template

step 3 : click on edit HTML

step 4 : search below line
*<h4 id='comment-post-message'><data:postCommentMsg/></h4>*

Now replace *<data:postCommentMsg/>* in above line as "*plz leave a
comment dude*"

step 5 :click on save template.
You can change your default /post a comment /message by replacing
<data:postCommentMsg/> with your custom message.Visit your blogger blog
once after changing default post a comment text and see your custom
message in that default post a comment text. Like this we can change
posts a comment message with custom image on blogger blog.We can also
change posts a comment text front size on blogger blog by replacing  *h4
with h3,h2 or h1 *in the code on step4 .

      How to replace post a comment message on your blogger with image :


Replace *<data:postCommentMsg/>  with *<image src=" *your custom posts a
comment text image url*"/*>*  in the step 4 to change post a comment
with an custom image.
*Note : * replace  *your custom posts a comment text image url* with
your custom image url in the above line.

We can add background image , font color and many more to your post a
comment text in blogger blog using html tags.like this we can easily
change and customize post a comment text message on your blogger blog.


See Also:  How to align pages/page list gadget on blogger

10


9


8


7


6


5


4


How To Remove Blogger Attribution Gadget/Widget :

 Remove Blogger Attribution Gadget

 We can see "powered by blogger" message on blogger footer , that can be added by attribution widget.Blogger attribute gadget/widget appears on at the bottom of the Blogger blog footer.We can edit and remove the attribute gadget/widget in blogger.By default blogger attribution was
locked, so we can't remove that widget.So to remove attribution widget , we have to unlock that widget first and then remove. In this post i'm explaining how to unlock unlock attribution widget and remove
attribution widget on your blogger blog.

Follow below steps to remove :


step 1 : go to blogger dashboard

step 2 <javascript:void(0);> : click on template

step 3 : click on edit html and tick expand widget templates box

step 4 : search below tag

<b:widget id='Attribution1' locked='true' title='' type='Attribution'>

and change locked='true' to locked='false'

and then click on save template

step 5 : Then go to layout click on edit corresponding to attribution
widget and click on remove to remove gadget <javascript:void(0);>.

see also:  How to add extra column to blogger footer

How to add extra column to blogger footer


Add Extra Column to Blogger Footer

 
By default blogger contains one column, 2column and 3column footer layouts.Suppose if we want 4 column footer ,then we have to manually add extra column to blogger footer.We can easily add extra column to blogger footer with out adding any CSS code to blogger.We can Add 3 Column or 4
Column Footer to Blogger.

Follow below steps


 step 1 : go to blogger dashboard

step 2 : click on template

step 3 : click on edit template

step 4 : serach <footer> tag in template code, in <footer> section u can
see below code

<macro:param default='2' name='num' value='2'/>

if you want to add extra column  increase value='2' to 3 i.e value='3'
or more

step 5 : click on save

Now you can easily add extra column to your blogger footer.

SEE ALSOHow to add search box to blogger


How to increase blog posts in label page (category page)


 increase blog posts in label page(category page)


By Default  Blogger has set a maximum 20 blog posts in its label page (category page).We can  limit the number of posts displayed in label pages in blogger i.e we can increase or decrease the number of posts
displayed in labels page. If you want to increase blog posts in its label page (category page) 

 follow below steps:

step 1 : Go to blogger --> Dashboard-->template -->edit template

step 2 : Press  ctrl + l  and paste expr:href='data:label.url' in
search box and search then you find expr:href='data:label.url'

step 3 : Replace it with expr:href='data:label.url +
"?max-results=100"', to display 100 post in label.

step 4:  Repeat this process for all instances of
expr:href='data:label.url'  in template.

step 5: click on save.
 
 we can also decrease blog posts in labels page by simply
decreasing value in max=results attribute. 


How to add image to blogger header :


 add image to blogger header

We can change background color of header.We can also add a custom image to blogger blog header.
We can add background image to blogger header from your blogger layout or adding background tag to header css code in blogger template code.This post will help you to add custom image to blogger header using basic method and another method.

follow  below steps

step 1:Go to blogger dashboard
step 2 : click on template and click on edit html
goto  */header - wrapper
                          {
                            width : --px;
set width and click on save template.

step 3:  You have to choose image with size as shown in width in template.

step 4:  Then go to blogger layout  and click on edit corresponding to
header

step 5 : click on browse button and add image from your computer or from
web , and then click on save

You can also add image to your blogger header by editing header css code
in your blog template code.This is good method to add background to
blogger header compared to above basic method.


      Another method to add background image to your blogger header :

step 1 : Go to blogger dashboard

step 2 : Click on template

step 3 : Click on edit HTML

step 4 : Search .header-outer {


Add below tag before closing tag of above line.

Background : url(" background image url ");

step 5 : Click on save template

How to add search box to blogger :


add search box to blogger

Generally we use search box on any blog to search posts in that blog.It is better to add search box to blog if it has more posts, because it is hard to find out required posts on blog with out search box. If blog has
search box visitors can find particular posts by simply typing post name on search box and click on search button. We can add search box to blogger blog with search box gadget.

Follow below steps

 step 1 : Go to blogger Dashboard.
 
 step 2 : Click on layout
 
 step 3 : Click on add new gadget
 
 step 4 : Add search box gadget

*          title :* give tile name (appear on above search box).
*          tabs :* select *This Blog* (when the user search topic on
search box in your blog, then it shows the results from your blog, not
from out side of your blog)
 if you select the *Web* then it shows the results from search engine
(Google) and results will appear  inside your blog)
 
 step 5 : click on save

We can also add search box to blogger blog with 3rd party code but some
times they may show error , so it better to add search box to blogger
with blogger search box widget.

After adding search box to your blog , you can move that search to any
where in your blog.Suppose if you want to move the search box to your
blog footer then simply drag the search box widget and drop on your
blogger footer on blogger layout.
/*How to move search box : */

  * Go to blogger dashboard
  * Click on layout
  * Drag search box widget and drop in any where of your blogger.
  * Click on save arrangement

How to hide blog title and description from header on blogger:


hide blog title and description from header on blogger

We can delete or hide blog title and description from blogger blog header.With out adding any CSS code we can easily delete blog title and description from blogger header. 

follow below steps

step 1 : go to blogger dashboard

step 2 <javascript:void(0);> : click on template

step 3 : click on edit template and tick expand widget templates box

step 4 :
*To Delete blog title *
search for below code

.Header h1 {
  font: $(header.font);
  color: $(header.text.color);
  text-shadow: 0 0 $(title.shadow.spread) #000000;

 and add  display <javascript:void(0);>:none; after above code to delete
blog title.

*To Delete blog description *
 search for below code

.Header .description {
  font: $(description.font);
  color: $(description.text.color);

 and add  display <javascript:void(0);>:none;  after above code to
delete blog description

 step 5 : click on save template.

How to add mp3 files to blogger blog


Add MP3 Files To Blogger Blog

We can't add mp3 music <javascript:void(0);> files to blogger blog, we can't store mp3 files in blogger blog.To add MP3 files to blogger blog , first you have to store MP3 files in Google sites <javascript:void(0);>.Not only Google sites <javascript:void(0);>, we can also store mp3 files on any hosting sites <javascript:void(0);>.Below i'm explaining to add mp3 files to your
blogger blog using Google <javascript:void(0);> sites.


follow the below steps to add mp3 files to blogger blog

step 1 : go to Sites.Google.com

step 2 <javascript:void(0);> : create account <javascript:void(0);>

step 3 : Upload MP3 file to Google sites <javascript:void(0);>

step 4 : copy file storage location link on Google sites
<javascript:void(0);>

step 5 :  on blogger posts editor clock on HTML mode and add MP3 file
link to post.

Like this you can add mp3 files to your blogger blogs easily.


How to Delete All Facebook Messages With One Click


Delete All Facebook Messages With One Click

By default we can't delete all messages in our Facebook at once. But with  Facebook Fast Delete Messages chrome extension we can delete all Facebook messages at once.

Follow below steps

step 1 : go to Google chrome and

step 2 : Search " Facebook Fast Delete Messages " on chrome web store
search box

step 3 : click on extension and add Facebook Fast Delete Messages to chrome

step 4 : Go to your messages then you will see delete all button

step 5 : scroll down to all messages and click on  Delete All button

How to Add Widget/Gadget Inside Blogger Blog Header


Add Widget/Gadget Inside Blogger Blog Header

By default blogger blog header widget will be locked and it has not possible to add widget inside blogger blog header.We can add extra widget inside blogger header.To add widget inside blogger header , we
need to set yes on showaddelement on header section and unlock header widget and do some changes .

follow below steps to add

step 1 : go to blogger dashboard

step 2 : click on template

step 3 : click on edit html and tick expand widget templates

step 4 : find below line in template code

<b:section class='header' id='header' maxwidgets='1' showaddelement='no'>

and chanage showaddelement='no' to 'yes' and increase maxwidgets='2'
i.e <b:section class='header' id='header' maxwidgets='2'
showaddelement='yes'>


Now gadget added inside blogger header, but header gadget will not move
to any where because it's locked. So we need to unlock header widget to
change widget position.

see below code in template , it will appear after above code

<b:widget id='Header1' locked='true' title='your blog title (Header)'
type='Header'>

replace above code with below code

<b:widget id='Header1' locked='false' title='your blog title (Header)'
type='Header'>

step 5 : click on save template

Now click on layout , now you can see extra widget on your blogger blog
header.

how deactivate yahoo account

how deactivate yahoo account

To delete your yahoo account click this link. 

https://edit.yahoo.com/config/delete_user ( note: this link open in new window)

Follow all the prompts when you close out your account. Please be sure to read all warnings very carefully during the account deletion process. 

Warning : Once an account has been deactivated, you will lose access to it as well as all of your stored information.  it's impossible for Yahoo to reactivate the account or retrieve any stored info. You're always welcome to sign up for a new Yahoo account.

How to Delete a Google or Gmail Account

How to Delete a Google or Gmail Account:

Deleting your Google account is a big decision. By doing so, you lose access not only to Gmail, but to any Google product and service attached to your account. Deleting accounts can be a little confusing if you have multiple Google accounts and only want to remove one, so read this guide for step-by-step details on how to permanently erase your Google presence.


Log in to your Google account that you want to delete. Click the arrow next to your name to double-check that you are not signed in with multiple accounts.


Open your account details. In the upper right next to your avatar, click the small downward-pointing arrow to pull up your card, and click Account.


Scroll down to Account Management. You have the option of deleting just your profile and Google+ features, or deleting your entire Google account. Click the "Close account and delete all services and information associated with it" link. This will open the Delete Google Account page.


Check all of the boxes. In order to delete your account, you will need to confirm that you understand that you will lose access to all Google services. Before you can delete your Google account, you must confirm your intention to do so, by checking off each and every service you will lose should you close your account.


Close your account. Enter your account password and then check the boxes to confirm you want to delete your account. When you have affirmed that you no longer wish to have a Google account, click Delete Google Account.
              
You will also need to confirm that you will be responsible for any outstanding financial transactions through Google Wallet.


How to delete your Facebook account

How to delete your Facebook account:

You have 2 options here: deactivate your account or delete it permanently. Deactivating is essentially the same as deleting, except that all your data is retained, but not visible until you reactivate.

1. To deactivate:

  • Visit your Account Settings

  • Choose "deactivate account"

  • Fill out the form, and click "Deactivate My Account"

2. To delete:


Oops! I deleted it! How can I get my account back?

If you deleted your account, this can not be undone. If you only deactivated it, simply login to your Facebook account again, and Facebook will send you a confirmation email to reactivate.

SEO Tips For Blogger or Blogspot

SEO Tips For Blogger or Blogspot:


This post will help you to know about how to optimize your Blogger or Blogspot website for better SEO results. This post will show you top SEO tips for Blogger or Blogspot. We all should know SEO stands for Search Engine Optimization. But why is this important? SEO is very important whether it is a site or website or blog. Better SEO will make your website or blog or site viral and listed in the top of the search result and you will get free organic traffic or visitors from Search Engines. People always like see or read top results from search results.

Blogger or Blogspot blogs are not great for SEO even after it is owned by google. So if you want your blogs to be more Search Engine Optimization you can use these SEO tips for your Blogger or Blogspot.

1 SEO Tips for Blogger or BlogSpot: – Meta Descriptions

 You should provide Meta Description in every post you publish. Meta Descriptions are 2-3 lines description of your blog. It is good for Search Engine Optimization because it helps search engine to understand your blog in 2-3 lines.  In the new Interface of Google Blogger it very easy to add a custom description. While you are publishing a new post you can simply add 2-3 lines in the description box on the right sidebar.

2 SEO Tips for Blogger or BlogSpot: – Keywords

Key words play a very important role in Search Engine Optimization. As most people only search for key words. So you should have At least 2-3% keyword density. It means if you have a blog of 500 words you can use 10 to 15 keywords from the blog. But please avoid keyword stuffing. Keyword stuffing means people put so many key words in their line so your blog start becoming meaningless. It looks like reader is just reading the keywords.
  

3 SEO Tips for Blogger or BlogSpot: – Permalinks

 Permalinks are one of the best SEO tips. It is the first thing which is seen by the Search Engine. And now BlogSpot also provide you to customize it. You should take the advantage of it. The link should be near 50 characters and explains everything about your blog. Your Permalinks should also contain some necessary keywords of your blog.

4 SEO Tips for Blogger or BlogSpot: – Post Title

This is one of the coolest SEO tips I have seen. As you have noticed that the title of your BlogSpot page is always your site title then your blog title. It should be like your blog title then your site title. So you can change it by editing your blog HTML. So the steps are
-          Go to your template page in your blogger
-          Take the backup of your template (BEST PRACTICE)
-          Click on Edit HTML
-          Search for <title><data:blog.pagetitle/></title>
-          Replace it with
<b:if cond= ‘data:blog.pageType == &quot;index&quot;’>
<title><data:blog.title/></title>
<b:else/>
<title><data:blog.pageName/></title>
</b:if>
-          Save the template.

5 SEO Tips for Blogger or BlogSpot: – Images

Images help a lot in Search Engine Optimization. Search Engine doesn’t see the images they just read about the images in your like there Title and alt tag which can easily be added by clicking on the images when you are in edit mode and mention it in the property.

6 SEO Tips for Blogger or BlogSpot: – Labels

Labels are same as the keyword or not. It is very controversial. But no doubt it is very important for Search Engine Optimization. You should use proper, descriptive and unique labels for your blog. A blog should have at least 3 to 5 unique labels.


7 SEO Tips for Blogger or BlogSpot: – No-Follow

 Add rel=”nofollow” tag in every external link you specify in your blog.

8 SEO Tips for Blog SEO Tips for Blogger or BlogSpot Spot: – Meta Tags

As I have told you before in tip 1 and 2 that you should specify the Meta description and keyword for every blog. So why I am mentioning it again. Now I am telling you to add Meta tags in your Blog template. The steps are
-          Go to your template page in your blogger
-          Take the backup of your template (BEST PRACTICE)
-          Click on Edit HTML
-          Description Tag <meta name=”description” content=”You can describe your site here “>
-          Keyword tag <meta name=”keywords” content=”keyword1, keyword2, keyword3, write as many as you want”>
-          Ad these tags to your templates and hit save.
This tag will the generic tags and a description of your blog.


9 SEO Tips for Blogger or BlogSpot: – Link Building

This is very important steps for Search Engine Optimization. As one of the biggest factors in Page Ranking is backlinks. A backlink is nothing but just a link to your site in any other site. But on which site it matters.

10 SEO Tips for Blogger or BlogSpot: – Unique Content

If you rate the Search Engine Optimization tip of all time for any site of blog this is the most important tip. If you write the Unique Content this mean people who are searching for it will definitely visit your site and Search Engines love unique contents. People may voluntarily link back to you.

Contact Form Widget for Blogger

Awesome Contact Form Widget for Blogger 

.

Step 1 : Adding the Contact Form:

First of all add a Contact form widget to your blog. To do so go to my post Contact Form for Blogger.
Do not worry about that the widget will be visible everywhere on the blog and our motive is to show contact us form only on a particular page. We will fix it in the second step.

Step 2 : Adding the CSS

Once you have added the Contact form widget go to Blog Title → Template → Edit HTML. Now add the below given CSS code just above ]]></b:skin> .

#ContactForm1{
display:none;
}
#contact_wrap {
margin: auto;
width: 321px;
height: 380px;
padding: 25px;
border-radius: 1em;
border-top:1px solid #dbdbdb;
border-right:1px solid #b2b2b2;
border-left:1px solid #dbdbdb;
border-bottom:1px solid #9d9d9d;
background-color:#cccccc;
filter:progid:DXImageTransform.Microsoft.gradient(GradientType=0, startColorstr='#f2f2f2', endColorstr='#cccccc');
background-image:-webkit-linear-gradient(top, #f2f2f2 0%, #e6e6e6 50%, #cccccc 100%);
background-image:-moz-linear-gradient(top, #f2f2f2 0%, #e6e6e6 50%, #cccccc 100%);
background-image:-ms-linear-gradient(top, #f2f2f2 0%, #e6e6e6 50%, #cccccc 100%);
background-image:-o-linear-gradient(top, #f2f2f2 0%, #e6e6e6 50%, #cccccc 100%);
background-image:linear-gradient(top, #f2f2f2 0%, #e6e6e6 50%, #cccccc 100%);
box-shadow: 1px 1px 5px #ccc;
}
#contact_wrap h3{
color: #e8f3f9;
font-family:Georgia;
font-size: 20px;
font-style:italic;
font-weight:bold;
margin: 0 -36px 20px -36px;
padding: 12px;
text-align: center;
text-shadow: 2px 0 0 #1f4962;
-webkit-box-shadow: inset 0 0 25px rgba(0,0,0,0.3),0px 1px 5px #666;
-moz-box-shadow: inset 0 0 25px rgba(0,0,0,0.3),0px 1px 5px #666;
box-shadow: inset 0 0 25px rgba(0,0,0,0.3),0px 1px 5px #666;
background-color: #3689b9;
position: relative;
}
#contact_wrap h3:before {
content: ' ';
position: absolute;
bottom: -10px;
left: 0;
width: 0;
height: 0;
border-style: solid;
border-width: 10px 0 0 10px;
border-color: #333 transparent transparent transparent;
}
#contact_wrap h3:after {
content: ' ';
position: absolute;
bottom: -10px;
right: 0;
width: 0;
height: 0;
border-style: solid;
border-width: 0 0 10px 10px;
border-color: transparent transparent transparent #333;
}
#ContactForm1_contact-form-name{
width: 270px;
height:auto;
margin: 5px auto;
padding: 10px 10px 10px 40px;
background:#f6f6f6 url(https://blogger.googleusercontent.com/img/b/R29vZ2xl/AVvXsEjHiQtokWO7nzU2QuuipzwbAR71zqpF58d8hG34HL7Ww871I1VRDPLeKXmlr5ygMkIeAgaix12WebZBf2OW4PSINwnZervasVjNQ97Qpc0uHj1ypf2-y2rwuqgMZ4lizTXF529_8ujXi2g/s1600/user.png)no-repeat 10px center;
color:#777;
border:1px solid #ccc;
-webkit-border-radius: 4px;
-moz-border-radius: 4px;
border-radius: 4px;
-webkit-box-shadow: rgba(0, 0, 0, 0.247059) 0px 1px 3px inset, #f5f5f5 0px 1px 0px;
box-shadow: rgba(0, 0, 0, 0.247059) 0px 1px 3px inset, #f5f5f5 0px 1px 0px;
}
#ContactForm1_contact-form-email{
width: 270px;
height:auto;
margin: 5px auto;
padding: 10px 10px 10px 40px;
background: #f6f6f6 url(https://blogger.googleusercontent.com/img/b/R29vZ2xl/AVvXsEjCFhVCwMne04pu5P2mBK5Q9aGngzvFQ4zeAE4VIp6xUrVl1xWRs77hfg5oavbLjRUnCgBRgSlgt64iaEv_IZIurRDEwD_XDCmYEdrrc46clE_mTJdT_2qf4bMcDk5sYfTbX96eIdTzoII/s1600/pen.png)no-repeat 10px center;
color:#777;
border:1px solid #ccc;
-webkit-border-radius: 4px;
-moz-border-radius: 4px;
border-radius: 4px;
-webkit-box-shadow: rgba(0, 0, 0, 0.247059) 0px 1px 3px inset, #f5f5f5 0px 1px 0px;
box-shadow: rgba(0, 0, 0, 0.247059) 0px 1px 3px inset, #f5f5f5 0px 1px 0px;
}
#ContactForm1_contact-form-email-message{
width: 270px;
height: 150px;
margin: 5px auto;
padding: 10px 10px 10px 40px;
font-family:Arial, sans-serif;
background: #f6f6f6 url(https://blogger.googleusercontent.com/img/b/R29vZ2xl/AVvXsEhDvQxcyuWaZXkBhSRsBPQbNWBCNHtTC-NyWlcAdo7yCQiHYNjmF3_vPlItTYCNI91FOur5Gft9SOlQ1ztyTxXsVwzuH9gCWeWq4_DLi5R0_P9xpd6WZ717KHjcyOBRywfS0BK-vCHI0-A/s1600/msg2.png)no-repeat 10px 10px;
color:#777;
border:1px solid #ccc;
-webkit-border-radius: 4px;
-moz-border-radius: 4px;
border-radius: 4px;
-webkit-box-shadow: rgba(0, 0, 0, 0.247059) 0px 1px 3px inset, #f5f5f5 0px 1px 0px;
box-shadow: rgba(0, 0, 0, 0.247059) 0px 1px 3px inset, #f5f5f5 0px 1px 0px;
}
#ContactForm1_contact-form-submit {
width: 95px;
height: 30px;
float: right;
color: #FFF;
padding: 0;
cursor:pointer;
margin: 25px 0 3px 0 0;
background-color:#005a8a;
border-radius:4px;
text-shadow: 1px 0 0 #1f4962;
-webkit-box-shadow: inset 0 0 35px rgba(0,0,0,0.3),0px 1px 5px #666;
-moz-box-shadow: inset 0 0 35px rgba(0,0,0,0.3),0px 1px 5px #666;
box-shadow: inset 0 0 35px rgba(0,0,0,0.3),0px 1px 5px #666;
background-color: #3689b9;
border:1px solid #194f6d;
}
#ContactForm1_contact-form-submit:hover {
background:#4c9bc9;
}
#ContactForm1_contact-form-error-message, #ContactForm1_contact-form-success-message{
width: 320px;
margin-top:35px;
}  

After adding the code save the template.

Step 3 : Adding the HTML in Page


First of all we need to create a new page and to do this firstly go to Blog Title → Pages → New Page → Blank Page. Page editor will open, now click on HTML tab and paste the below given code in it.

<div id="contact_wrap">
<h3>Contact Us</h3>
<form name="contact-form">
<input id="ContactForm1_contact-form-name" name="name" placeholder="Name" size="30" type="text" value="" />
<input id="ContactForm1_contact-form-email" name="email" placeholder="Email" size="30" type="text" value="" />
<textarea cols="25" id="ContactForm1_contact-form-email-message" name="email-message" placeholder="Message" rows="5"></textarea>
<input id="ContactForm1_contact-form-submit" type="button" value="Submit" />
<div style="max-width: 222px; text-align: center; width: 100%;">
<div id="ContactForm1_contact-form-error-message">
</div>
<div id="ContactForm1_contact-form-success-message">
</div>
</div>
</form>
</div>

<style type="text/css">
#comments, #blog-pager, .breadcrumbs, .post-footer{display:none}
</style>

After adding the above code, publish the page.

You are done now. Now you and your visitors can see this awesome and cool contact form widget in your blog.

Contact Form for Blogger

How to add this widget to Blogger

 Adding this widget is quite easy. Just follow the below steps to add it.

1. Go to Blogger.com → Blog Title → Layout → Add Widget

2.  From the tabs menu click on More Gadgets.

3. Now click on Contact Form and finally Give your desired heading to it

4. Save the widget and lastly save the Template


How to add Contact Form 

Thats it. Now whenever a visitor wants to contact you he can do the same by just press a single button moreover you can see the messages in your email box.


How to use a Subdomain for your Blogger blog

How to use a Subdomain for your Blogger blog

Google already provides you a tutorial on how you can add a domain to your blogger blog. But it does not specifically show the steps for setting up two domains - 1. Main Domain 2. Subdomain for your two blogger blogs i.e. you will have two blogs one on main domain and the other on subdomain for example http://bloggertrickess.blogspot.in/ and
Below are 3 easy steps with images on how you can add a subdomain to your blogs existing domain without any difficulty.

  Step 1 : Add a A Name Record:

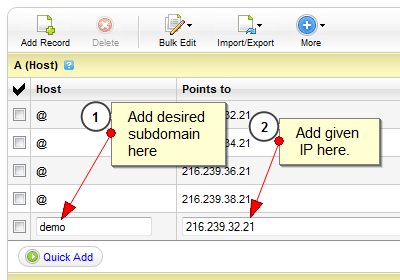
Go to your domains registrar website and click on Change DNS/DNS Manager option. There you would find different CNAME and A records you have made previously for your main blog. Add another A name record with the the desired subdomain as your host. For example if you want subdomain http://demo.bloggertrickess.com/ for your blog then enter demo in the host name. In the IP/Point to section add this IP - 216.239.32.21 After adding save the record.
             Subdomain Blogger 

Step 2 : Setup the domain in Blogger

 Now go to Blog Title → Settings → Basic → Blog Address → Add a Custom Domain → Switch to Advance Settings and add your full subdomain in our case it would be demo.allbloggertricks.com. Make sure the box saying "Redirect bloggertrickess.com to demo.bloggertrickesss.com" is unchecked else when someone goes to bloggertrickess.com (with no www ) they will be redirected to http://demo.bloggertrickess.com/
 

Step 3 : Settings in the main Blog (Required in some cases)

 Even after unchecking the box above, if the domain
 http://bloggertrickess.com (without www) redirects you to http://demo.bloggertrickess.com Go to Main Blog Title → Settings → Basic → Blog Address → Edit and check the box which states "Redirect allbloggertricks.com to www.bloggertrickess.com" Thats it, the whole setup is done. Sometimes if takes 1-2 hours for making the changes by the domain registrar but most of the time change is withing 5 minutes. Your custom subdomain is ready.

How to Change blogger/Blogspot Domain Name

How to Change blogger/Blogspot Domain Name :

Ever wondered if you can change the blogspot domain in your blog ? The answer is Yes you can. Suppose you have a domain name myblog.blogspot.com and you wish to change its domain to techguide.blogspot.com then what would you do ? Download template and posts and upload in a newly created blog updates the widgets and hell lot of things. The answer is NO. You can simply change the URL of your blog.
Below is the step by step guide to show you how you can change the blogspot domain name in your blogger blog.

Step by Step Guide

  1. Go to Blogger.com
  2. Click the arrow button which is beside your Blogs name and select Settings
  3. In the Basic Tab (Open by Default) you would see three categories Basic, Publishing and Permissions.
  4. Under the Publishing settings click the Edit text which will be be beside your blog URL.
 Blogger Domain Tutorial


  1. Enter your new desired domain and click save. You will see a confirmation popup showing that your desired settings has been saved.
  2. Now you can see your blog on a fully new URL.
This setting can be useful for those who want to change their blogger domain name. Blogs with personal names decrease it value in such cases this can be the best solution.


How to make money form your blog

How to make money form your blog:

make money form your blog through following method:

Google Adsense:

With Blogger, you can earn money just by posting high-quality original content on your favourite topics. Blogger has a dedicated Monetise tab that allows you to easily place AdSense ads on your blog.

Affiliate Marketing:

You can earn money through Affiliate Marketing ( Promoting others product).

Freelancing sites

Email Marketing:

Selling emails to advertisers.

Paid Reviews

Donations:

Put donation button on your blog.

Selling your won Product: 

By selling your product.

if you want earn money you have to work hard. some people telling that you can make money from your blog easily, that is really wrong. we can't  earn even 1 cent without working hard. So we have to work hard on blog before earning money. we have to get more traffic to blog . totally earning depends on blog traffic.

Note : if you get more visitors then we get more money


7 Ways to Make Money From Blogging

7 Ways to Make Money From Blogging: 

  AdSense

When it comes to putting advertisements on your blog to generate income, Google’s AdSense is often the top pick for bloggers. It’s simple to use and doesn’t require you to have a great amount of technical know-how.
To put an AdSense ad on your blog, you pretty much just have to copy and paste the code.
It’s also one of the biggest advertising networks available, so you’ll have a wide range of advertisers to work with. That also means that you can make money from it even if your blog falls into a pretty obscure niche.

Amazon Associates

The Amazon Associates program allows you to earn a portion of sales when people click-through from your blog to Amazon.com and make a purchase.
You only earn money when people buy something from the web giant and the amount you earn varies based on what people order and how many people purchase through your links.
The Associates program works best for people whose blog focuses on products and shopping in someway. You’ll earn more money if people are in a shopping mood when they visit your site.

Other Affiliate Programs

While Amazon’s affiliate marketing program might be one of the biggest out there, it’s definitely not the only one available.
Depending the topic of your blog and the amount of traffic you get, you can participate in any number of other marketing programs. Some marketing programs only want blogs that have a high traffic volume, so you might have to wait and build your audience before signing up.
As your blog grows, fun ways to make money online can include reaching out to small companies whose products you trust and use to see if they would like to set up an affiliate marketing program with you.
You would post a link to their product on your blog and if someone clicks through your blog to their site and orders it, you would get a portion of the sale.

How To Add Social Media Icons to Blogger Header

Adding Social Media Icons to Blogger Header

Step 1. Sign in Blogger then go to  Blogger dashboard, go to Template and click on the Edit HTML button:


  Step 2.

Screenshot 1:


Screenshot 2:


To expand the style, click on the small arrow on the left of <b:skin>...</b:skin> (screenshot 1), then click anywhere inside the code area to search (using CTRL + F) for the ]]></b:skin> tag (screenshot 2) and add this code just above it:


Copyright © 2013 Blogger Trickess

Design by sandeep verma